Different Ways To Tie Dye – Tie Dye Stripes Designs
Jump To:
Tie Dye trend was popular in the US back in the 1960s as a part of the ‘Hippie’ and Psychedelic Cult, has made a fierce comeback. Celebrities, Fashion Houses, Influencers — it has been an absolute favorite of many with tie dye stripes. It has become all the more popular among the Masses given how easily it can be DIY-ed now. When you tie dye, aftercare aspects such as washing, drying, how to wash tie dye clothes with care will help keep the tie dye stripes. You can also apply reverse tie dye techniques in tie dye with bleach.
In this blog, we will be not just giving more insights into this major Fashion Trend but also give you a very easy tutorial on how to DIY this technique at your home
Tie Dye Techniques
With the rising popularity of Tie-Dying, there are several methods and techniques to it, resulting in some beautiful styles in themselves. What also owes to this experimentation is how easily all of these styles can be done by anybody.
The following are some popular techniques used in Tie-Dye
- Bull’s Eye Tie-Technique
- Spiral Tie-Dye Technique
- Shibori Technique ( A Japanese Form of Tie-Dye)
- Ombre Tie-Dye Technique
- Crumpled Tie-Dye Technique
- Striped Tie-Dye Technique
- Sunburst Technique and many more.
How To TIE-DYE At Home ( DIY TIE-DYE)
In this blog, we will be listing out the steps of one of the most popular techniques of Tie-Dye, so that you can easily DIY and wear it off to the streets embracing your new mask look!
Here’s how you can do it:
1. Bull’s Eye Technique
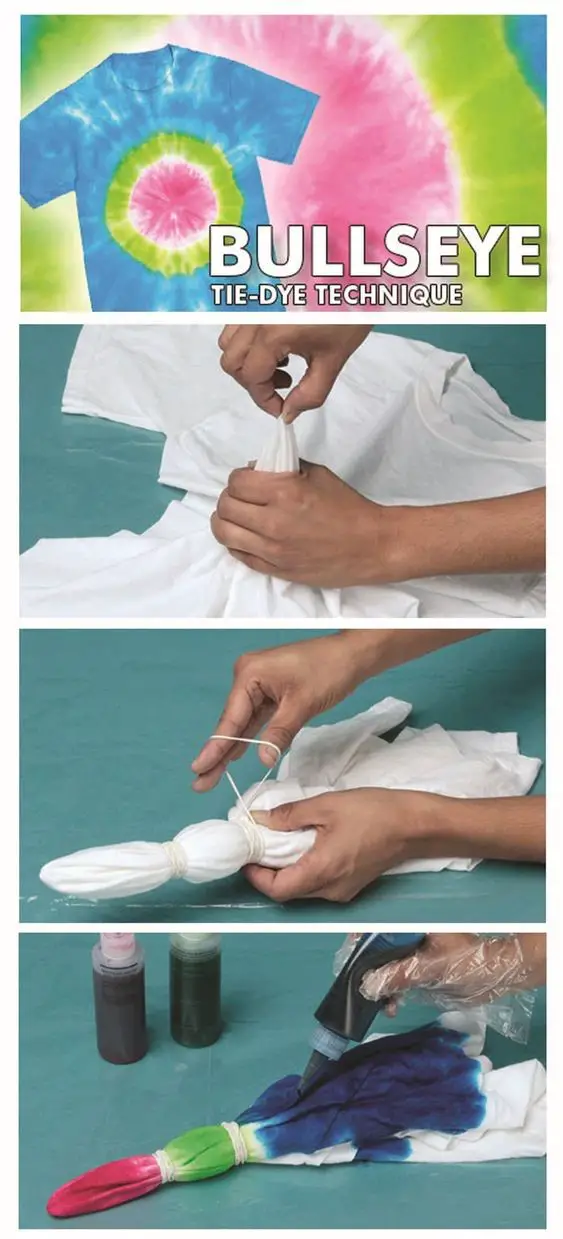
- Take a plain colored T-shirt (preferably a white T-shirt). Make sure it’s damp and natural fiber fabric and lay it on a table.
- For the Bull’s Eye Technique, choose the part of the fabric which would act as the center of the bull’s eye.
- Now pinch and pull the chosen part of the fabric (which would be the center of the bull’s eye) upwards and secure the other end of the fabric with our other hand.
- Now tie a rubber band approximately 1-2 inches from our chosen center. Then tie rubber bands after every 1-2 inch of the fabric and continue doing it till the end. It should essentially look like a long tube.
- Now take your chosen dye colors and squirt them well in the chosen areas, for the desired look.
2. Spiral Or Swirl Technique
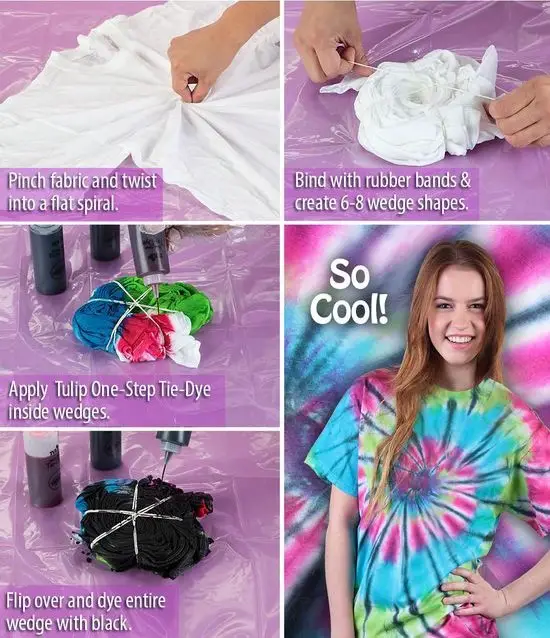
- Take the fabric and lay it flat on the table.
- Now we pinch the center of the fabric and start twisting the fabric into a circular motion.
- Continue this until all of the fabric is gathered and looks like a wedge-shaped ball.
- Secure the spiral with three rubber ties to sustain the wedge effect.
- Now add desired dyes onto the fabric.
- Flip the fabric and repeat the process of squirting the dye into the fabric.
3. Shibori Tie-Dye Technique
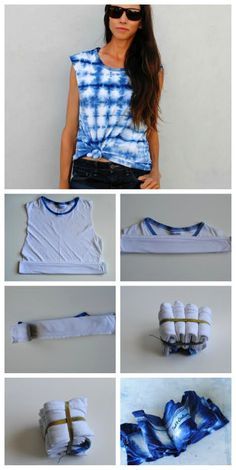
- For the Shibori Technique, lay the fabric on the table, and make accordion folds onto the fabric, from the bottom edge to the top part of the fabric in even folds.
- Now again fold the fabric( again into accordion folds) from one end to the other, till the fabric turns into a lump of folds.
- Take three rubber ties and wrap it around the fabric in criss-cross directions, tightly securing the folds in a criss-cross direction.
- Now squirt the desired colors into the fabric on both ends and let it dry for the prints to be bold and visible.
4. Ombre Tie-Dye Technique
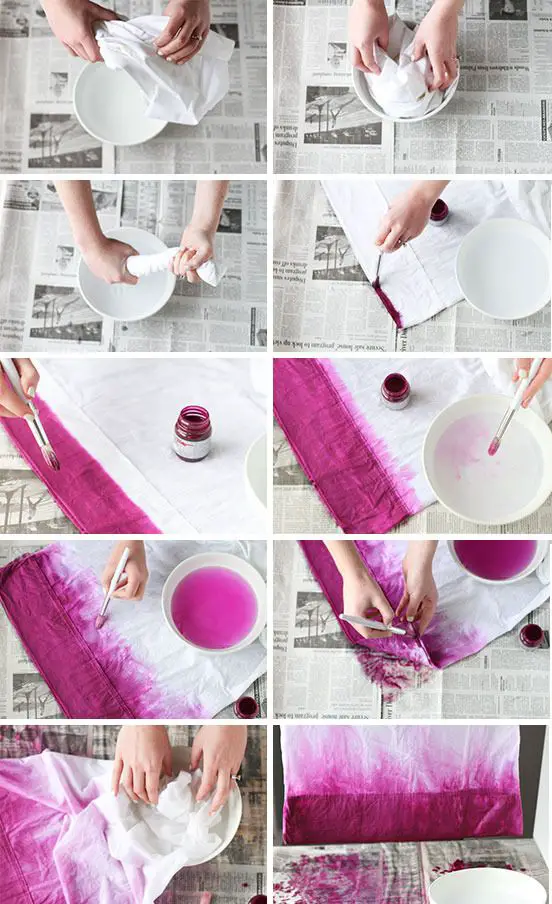
- Lay the fabric on the table and make sure it’s damp enough.
- Squirt the desired color from the top end of the fabric.
- Now take a large wet brush and use downward strokes to blend the color downwards to create a blend and a color saturation. Use color and water are accordingly used in getting the proper blend
- Once the desired blend for the first the color is done, now the same steps are repeated for the other chosen colors.
- Once the fabric has been dyed, hang the fabric and let it dry for the colors and patterns to be bright enough
5. Crumpled Tie- Dye Technique
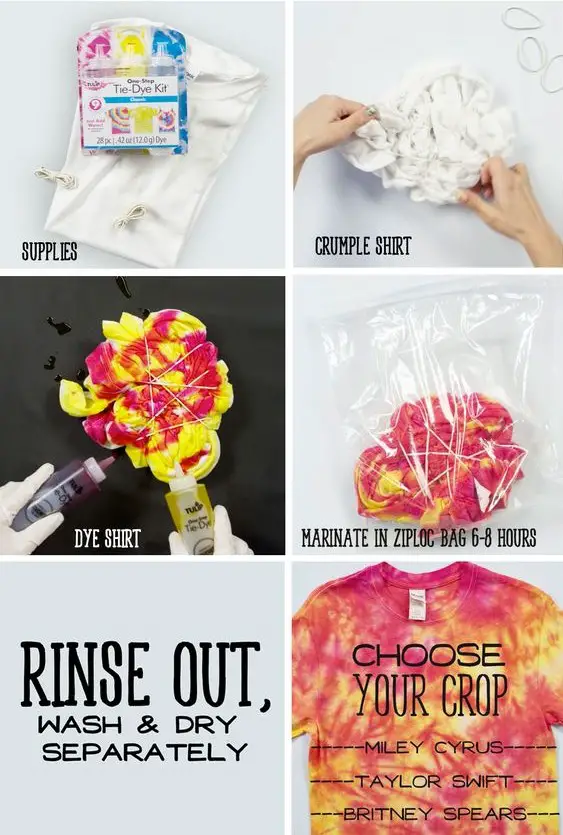
- Take the damp fabric into the workspace and scrunch the fabric to a crumpled mound. Keep the crumples loose or tight according to the style preferred. Tight crumples will give a more defined and crisp look.
- Now secure the crumples of the mound with rubber ties and squirt dye all over the fabric.
- Keep the fabric inside a plastic or a bag for the fabric to remain damp while the dye dries.
- The Crumpled Tie-Dye Fabric is ready to be used.
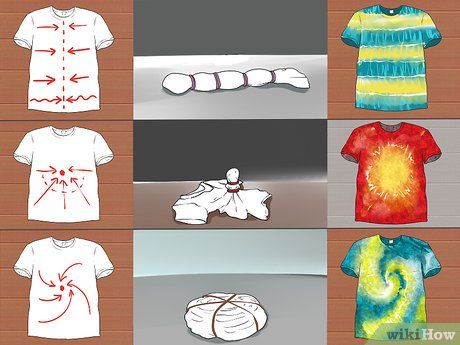
6. Striped Tie-Dye Technique
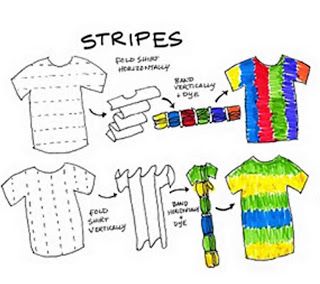
- Lay the damp fabric and make pleats of the fabric in horizontal or vertical lines, as per the stripes desired.
- Now one the fabric is pleated, secure the pleats of the fabric. Add as many rubber bands and space them as desired.
- Once this is done, squirt the chosen colors and let the fabric dry for 6-8 hours.
- Voila, DIY Striped Tie-dye Fabric is ready.
7. Sunburst Tie-Dye Technique
- Lay the Damp cloth on the table and pinch a small portion of the cloth upwards to 1-2inch respectively.
- Now secure a rubber band tightly around the pinched part of the cloth. This is the sunburst.
- Repeat the above steps for as many sunbursts as desired.
- Now squirt the chosen dyes into the sunbursts.
- Fill the other chosen dye into the remaining part of the fabric.
- Let it dry for 6-8 hours till the prints are bold and bright
Important Tips To Tie Dye
While Tie-Dye is definitely one of the simplest techniques to do in our homes, one should, however, keep certain tips in mind to ensure their entire endeavor with this process results in success and not in disappointment.
So while doing Tie-Dye at home, make sure you keep the following tips in mind your mind to get the best bold prints –
- Make sure your Fabric is Pre-Washed. Pre-Washing the Fabric will ensure the apparel is of the right fit, as sometimes fabric shrinks and also removes any possible dirt so that the dye saturates better.
- Also, it is important to ensure the fabric when you are going to Tie-Dye should be Damp, but not wet. You would want the color to penetrate and saturate well, but not drip.
- Make sure you secure the ties of the cloth tightly. This ensures the color penetrates and saturates better and you get the desired style and pattern.
- For Tie-Dye to be a success it is important to Squirt the color well into the folds and Squeeze the folds of fabric to ensure the color penetrates well inside the cloth. Make sure you Use Powdered Color and mix it with water in Squirt Bottles to get the perfect bold prints.
- Lastly, after the dye has been squirted, keep the fabric inside a plastic packet or bag to ensure that while the dye is drying the cloth remains damp. This will ensure big and bold prints
Are you ready to make yourself an entirely new and stylish outfit, that too, at home? We hear a big YES!
How do you tie dye at home?
Do you wash bleach tie dye in cold or hot water?
Finally, once you’re happy with the bleached out parts of your shirt, rinse it thoroughly with cold water and then wash it in your washing machine. Don’t wait on this or the bleach will eat through the fabric of your shirt!
Does shirt have to be wet to tie dye?
First, working in a well ventilated area, submerge the fabric in water. *You can also try skipping this step of getting the fabric wet first. It will produce slightly different results, but part of the fun of reverse tie dye is making different patterns and experimenting with different techniques.
How do you tie dye for beginners?
Alright, let’s learn how to tie-dye.
- Prep the materials. Before you tie dye, you need to prewash the garments.
- Mix your dyes.
- Pre-soak your garment, if necessary.
- Fold and tie your garment. There are so many ways to fold and tie your fabric.
- Apply the dye.
- Let the dye set.
- Rinse, wash, and wear your garment.
Is it better to tie dye wet or dry?
We generally recommend washing your fabric and leaving it damp before tie-dyeing, as the dye has an easier time saturating the fabric when it’s wet. Applying dye to dry fabric results in more color saturation but less uniform permeation throughout the fabric.
What supplies are needed for tie dying?
Here is a complete list of what you need to gather up: Tie-dye kit. Water (temperature according to kit instructions) Rubber bands. Disposable gloves. 100 percent cotton items to tie-dye (shirts, socks, curtains, pillowcases, etc.) Tarp.
Can I use food coloring to tie dye?
How to tie dye t-shirts with food colouring. If you don’t have any dye at home you can also use food coloring to tie dye t-shirts. But, because food coloring is an acid-based dye, you need to use clothing that is NOT made from plant-based fabrics like cotton and linen. Instead, use a polyester item of clothing.
Can you use food dye to dye clothes?
You can dye fabric with food coloring, but only if the fabric meets certain requirements. Dyeing with food coloring, gelatin, or drink mixes such as Kool Aid includes a few more steps than if you were to use commercial dyes specifically formulated for use on fabric.
Can I tie-dye a black shirt?
Can you tie-dye a black shirt? Yes, but you need to remove some color with a bleaching agent first. Black being a combination of all three primary colors, no dye can get it to change color, the combination of black and any color will still result in black.
Can you let tie-dye sit too long?
You definitely can let the tie-dye sit for too long, and it can leave you with very unpleasant effects that can ruin your tie-dye creation. We have lived this a lot at our workshop where we would forget a shirt for a few days or we were waiting to test it out.
Do you wash bleach tie-dye with detergent?
In the plastic bucket, prepare a mixture of 1 part bleach to 1 part water. Let the sweatshirt sit in the bleach mixture for about 10 minutes, or until you are satisfied with the color change. Remove the rubber bands and rinse the sweatshirt thoroughly. Wash with mild detergent and rinse as normal.
How do you tie dye with salt?
Wash the fabric in a washing machine. Add 1/2 cup of table salt and one cup of white vinegar, if desired. Use a cold water setting. Tumble or hang dry. Don’t add anything else to the load the first time or two that you wash your tie dye fabric.
Do you leave rubber bands on when washing tie dye?
You may want to wear gloves again for this step to avoid staining your hands. After 24 hours take the rubber bands off. To avoid colors bleeding over, you can hang your shirt to dry completely in the sun before rinsing in cool water until water runs clear.
Will tie dye ruin my washer?
Tie-dyed fabrics can make a fashion as well as a home decor statement. Unfortunately, tie-dyeing techniques may leave residual dye in the washing machine after laundering the fabric. Dye producers commonly recommend a method for cleaning dye from the washer.