Toddler Hairstyles
Jump To:
Kids like to move and fidget, especially when you do their hair. Half the time, Mom and Dad tie their curly hair into a ponytail and end the day, because it’s easier. We have picked up 15 toddler hairstyles with easy steps and reference pictures. The steps for each hairstyle are easy to follow. We are sure your little kids will fall in love with them!! Also, check out natural hairstyles for kids.
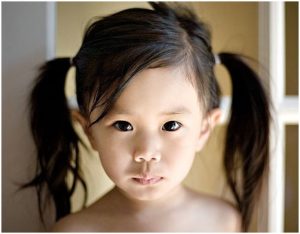
1. Casual Pigtails
Pigtails are the most common hairstyles for little kids. If you are looking for a casual hairstyle with minimal effort and cute looks for your kid this one is the right pick for you!
Steps To Follow:
- Gather all the hair and untangle it thoroughly.
- Make a full-fledged partition from the forehead to the back of the head.
- Now, gather the hair on one side of the partition to the place right above the ear and secure it with an elastic of your kid’s choice!
- Repeat the same on the other side of the partition and secure it with another elastic.
- Loosen them a little bit and your little one is ready to look cute!
Tips:
- Do not use this hairstyle when the hair is oily.
- You can use ribbons, elastics, and clips of different colours to accessorise the hairstyle according to the dress.
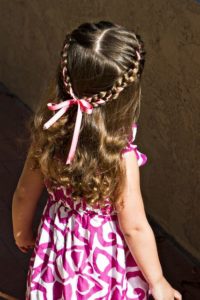
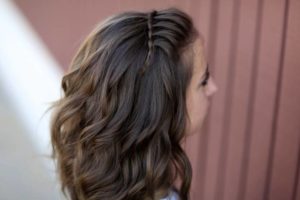
2. Princess Crown
A princess crown hairstyle goes well with cute dresses like gowns and frocks. It looks complex but it isn’t in terms of the procedure followed to achieve the hairstyle. Here are the steps for you to get an awesome princess crown for your toddler.
Steps To Follow:
- Firstly, gather all the hair and untangle it with a wide-toothed comb.
- Now, make a middle partition till the crown of the head.
- Take one side of the partition and do a french braid towards the centre of the back of the head.
- Then repeat the same on the other side of the partition.
- Gather the two french braids and secure them with a ribbon or an elastic. Now your baby is ready to rock the look!!
Tips:
- Do not miss out on untangling the hair before you start braiding.
- You can use an elastic instead of a ribbon for securing the braids.
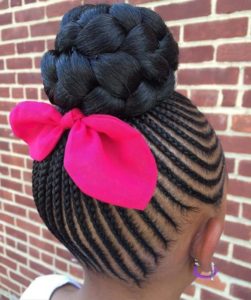
3. Braided Bun
Well, the image here depicts a braided bun on the top with micro braids all over the head and is accessorised with a pink ribbon. If you are looking for a simple no-nonsense hairstyle for styling your baby with a gown or a ballet performance, here is the right pick for you! Follow the steps below carefully to achieve a perfect braided bun.
Steps To Follow:
- First things first!! Give your toddler her favourite toy and request her to sit still for a while.
- Now, gather all the hair and tie it into a high ponytail on the crown with an elastic.
- Start braiding the ponytail as you do for a normal braid.
- Then, roll the braid into a bun on the top and secure it with a U pin
- Now, accessories it with her favourite ribbon and she is all ready for the ballet!!
Tips:
- Do not use any accessories other than ribbons for this hairstyle.
- You can loosen the hair a little bit for giving some extra volume to the bun if your baby’s hair is thin.
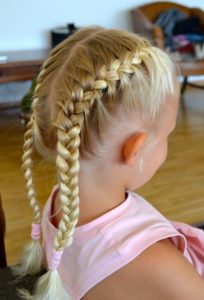
4. French Braids
French braids seem to be difficult to do but they are quite easy for straight and wavy hair types. Only if your toddler is okay with sitting still for some time!! Here are the steps for an easy french braid for giving your kids a cute yet classy look. The image here features a toddler with two french braids on each side. You can also choose to make it only one on the back of the head.
Steps To Follow:
- Firstly, gather all the hair and untangle it thoroughly to get rid of knots and tangles.
- Now, make a full middle partition.
- Gather one side of the hair while you secure the other side with a claw clip or an elastic so that it doesn’t mix with the hair that you are holding right now.
- Take a small part of the hair in the front and split it into three equal parts.
- Now cross the sections as you do for a usual braid while adding some hair from the sides.
- Braid it till the end and secure it with an elastic.
- Then, repeat the same on the other side of the partition. And now your baby is prettier than ever!!!
Tips:
- Make sure to untangle the hair before you start braiding hair.
- Do not miss to add the hair even at one step as it ruins the look of the hairstyle.
5. Bang Braids
Band braids are quite cute for toddlers with short hair or till the neck. If you are looking for a quick and comfortable hairstyle for your kid, this one is the right pick for you! To achieve this look for your toddler, make sure to follow the steps below and we are sure your kid will fall in love with it!! Here is an image featuring band braids for straight and short hair. Give it a try!!
Steps To Follow:
- Untangle the hair to get rid of the knots and tangles if any.
- Now make a side partition on the left and comb the hair thoroughly.
- Gather the hair on one side of the partition right on the top and start braiding as you do for a normal braid.
- Once you reached the end, secure the braid with an elastic.
- Then, repeat the same on the other side.
Tips:
- You can also try this hairstyle with a middle partition.
- Make sure to use only nylon elastics. You’d want to highlight the hairstyle but not the rubber bands and scrunchies on your baby’s head for sure!!
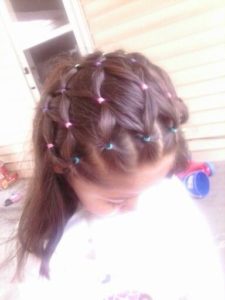
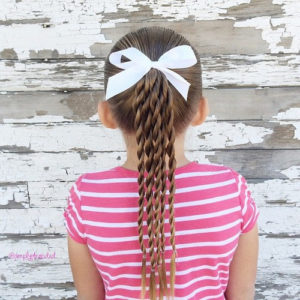
6. Netted Braid
Netted braid is a classy hairstyle with some fun elements added to it like colourful elastics and beads. It looks a little complex and we are here for the rescue! Follow the steps below to achieve the perfect netted braid hairstyle.
Steps To Follow:
- First, gather all the hair and comb it with a wide-toothed comb to get rid of the knots and tangles.
- Depending on the thickness of your toddler’s hair, make several square partitions in the front.
- Secure each partition using different colourful elastics.
- Now, take the second half of one partition, starting from one side of the head, pair it with the first half of the next partition.
- Repeat the steps as shown in the picture and secure each of them with elastics.
- Stop when you reach the desired length and your baby girl is ready to rock the look!
Tips:
- Do not use black elastics. Well, they are not as much exciting as colour elastics for kids!!
- Make sure that the hair in the front is equally partitioned.
7. Flower Braid
Try this braid hairstyle turned into a beautiful flower for your even more beautiful baby girl. The flower braid is a technique used for making a flower out of hair instead of using an extra accessory!! Follow the simple steps below to achieve the look as shown in the picture below. Dive in!
Steps To Follow:
- Firstly, gather all the hair and untangle it thoroughly.
- Make a partition on the headband are in a straight line.
- Grab the hair from the area right above one ear and start braiding it into a french braid towards the other ear.
- Once you reach the ear, finish the braid till the end and secure it with an elastic.
- Now, pull out a little hair from the right side of the braid and roll it into a flower.
- Lastly, secure it with a small U pin and your toddler is ready for killing it with cuteness and elegance.
Tips:
- Make sure to loosen the braid only on the right side to make it look like a flower.
- Do not accessorise the hair with anything since the flower you created using the hair can pull off the look easily!

8. Gibson Tuck
You will need a few U pins, bobby pins, and a pretty headband for this unique hairstyle for making it artistic and cuter. For short hair, tucking it with a usual ponytail is the only way. For long hair, you can tuck with a ponytail or a loose fish braid into a Gibson tuck. Make sure to follow the steps below to achieve the look as shown in the picture below.
Steps To Follow:
- Untangle the hair and tie a cute headband.
- Then, gather all the hair and tie it into a ponytail.
- Tuck the hair through the headband repeatedly.
- Secure the tucked hair with U pins or bobby pins, and loosen up a little bit.
Tips:
- Make sure to loosen up the hair to give it some extra volume.
- If your baby’s hair is thick, make sure to follow the same step using a fishtail for making it less voluminous.
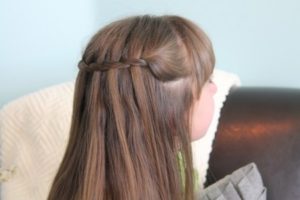
9. Waterfall Twist
If you are looking for a hairstyle with zero accessories and which is suitable for almost every outfit for your little girl, We think this is the right choice for you. Follow the steps below to achieve the look as shown in the picture below. Also, there are tips to get a perfect waterfall twist. Check them out.
Steps To Follow:
- Beginning with the right side, take a portion of hair and split it into two.
- Twist them once, take a portion of hair and make it pass through the twist.
- Repeat the steps and do not miss out on twisting the two strands as you move towards the left.
- Once you reach the left ear, secure the hair with a bobby pin.
Tips:
- Make sure to untangle the hair before you begin.
- Do not use any accessories so you can accentuate the efforts you put in to create the waterfall twist!!
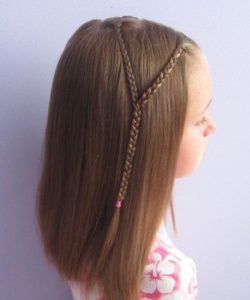
10. Hippie Braids
Hippie braids are quite cool, cute and also easy to make. If you are looking for an easy hairstyle with no accessories that look cute, this one is for you. Follow the steps below and we are sure that your baby girl will fall in love with it.
Steps To Follow:
- Comb the hair with a wide brush to get rid of tangles and knots.
- Now, take one portion of hair right above the temple and braid it to the desired length.
- Take another portion of hair from the crown part parallel to the first braid and cross the sections to form a braid.
- Pair both the braid and tie them together with an elastic.
Tips:
- Make sure to take smaller sections to make the braids more interesting.
- You can follow the same steps for a middle partition as well.
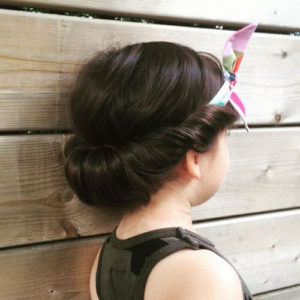
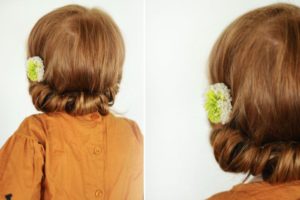
11. Sweet Roll Hairstyle
Sweet roll hairstyle is a classy hairstyle that goes well with gowns. Well, if you wish to try it with your toddler to make her cuter, make sure to follow the steps below carefully to achieve the look as shown in the picture.
Steps To Follow:
- Make a side partition and roll the hair on one side inwards while you add some hair to the roll.
- Repeat the same on the other side of the partition.
- Twist the hair inwards repeatedly.
- Secure the roll with U pins and bobby pins.
- Accessorise with a flower or a ribbon.
Tips:
- Do not overdo with the accessories
- Loosen up a little bit to give it an extra volume if your baby’s hair is thin.
12. Double Hair Bows
Try these cute double hair bows for your child and we are sure that your girl will not leave the mirror!! To bring out the little Lady Gaga in your child with this hairstyle, you will require to follow the steps below to achieve the look as shown in the picture.
Steps To Follow:
- Make a side partition and tie them into high ponytails.
- Use another elastic and make a loop out of the ponytail while you leave a part of the hair untouched.
- Spilt the leftover hair into two and wrap it over the middle of the loop.
- Turn the strands outwards in opposite directions and secure the bow with a U pin.
- Now repeat the same with the second ponytail
Tips:
- Make sure to use the hairpins and elastics that match your hair colour.
- For a better look, braid the ponytail before you pull it over the loops.
13. Waterfall Braid
If you are looking for a hairstyle with zero accessories and which is suitable for almost every outfit for your little girl, we think this is the right choice for you. Follow the steps below to achieve the look as shown in the reference picture below. Also, there are tips to get a perfect waterfall braid.
Steps To Follow:
- Beginning with the right side, take a portion of hair and split it into two.
- Twist them once, take a portion of hair and make it pass through the twist.
- Repeat the steps and do not miss out on braiding the strands as you move towards the left.
- Once you reach the left temple, disguise the braid into the loose hair on the back and secure the braid with a bobby pin.
Tips:
- Make sure to use thin strands for the braids for a better look.
- Do not miss out on untangling the hair before you start braiding the hair.
14. Twisted Ponytail
Here is the quirky and stylish pick!! This twisted ponytail is the best for denim, short dresses, and tees. To achieve the look as shown in the picture below, make sure to follow the steps carefully. For this, you will need elastics and a cute ribbon. Check it out!!
Steps To Follow:
- Gather all the hair and comb with a wide brush to untangle the knots if any.
- Now tie the hair into a high ponytail with an elastic.
- Split the hair into five to six parts depending on the volume and thickness of your baby’s hair.
- Now take one part of it and split it again into two equal parts.
- Twist them inwards separately.
- Then twist the two twisted portions of hair one over the other in the same direction, and secure them together with an elastic.
- Repeat the same for the other portions of hair and tie them separately with elastics.
Tips:
- Make sure to twist all the smaller portions in the same direction so that the twist stays still.
- You can use a coloured band or a scrunchie for the high ponytail instead of a ribbon.
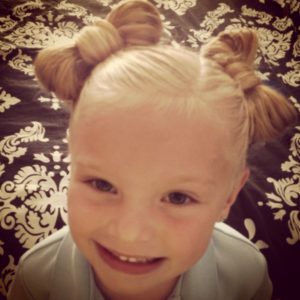
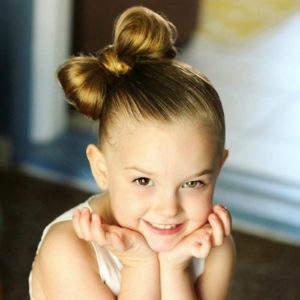
15. Minnie Mouse Bow
This one is for the Minnie mouse fanatics!! The image below features a cute Minnie mouse bow on the crown. Make sure to follow the steps below to bring the exact look as shown in the image. We are sure that your little girl is not going to stop looking at herself in the mirror!!
Steps To Follow:
- Firstly, gather all the hair and brush it thoroughly.
- Gather all of it and tie it into a high ponytail on one side of the head with the help of an elastic.
- Use another elastic and make a loop out of the ponytail while you leave a part of the hair untouched.
- Spilt the leftover hair into two and wrap it over the middle of the loop.
- Turn the strands outwards in opposite directions and secure the bow with a U pin.
Tips:
- Make sure to use the hairpins and elastics that match your hair colour.
- For a better look, braid the ponytail before you pull it over the loops.
Conclusion:
We hope this article with a list of Toddler Hairstyles With Steps And Reference Pictures helped you with fulfilling your dream of dressing up your toddler and changing your girl’s hairstyles for every occasion and every costume. Also, we are sure that your girls will love all of them!!