18 Simple Nail Art Designs With Tutorials – Easy Nail Art – Nail Art Procedures
Jump To:
Nails are an extension of what you wear, and fantastic nail art always garners a lot of attention and compliments. Besides, who doesn’t love an added dose of glamor to their nails? Nail art is a way if you’re bored of your classic, monotone nail color and want to try out something fun and quirky. Read on to find the perfect nail art design for whatever mood you are in. If you need a nail polish remover for a correction, here are some easy homemade nail polish remover recipes. You can do these nail art yourself right at home in just a few steps in nail art procedures. Let’s get into some easy and simple nail art designs.
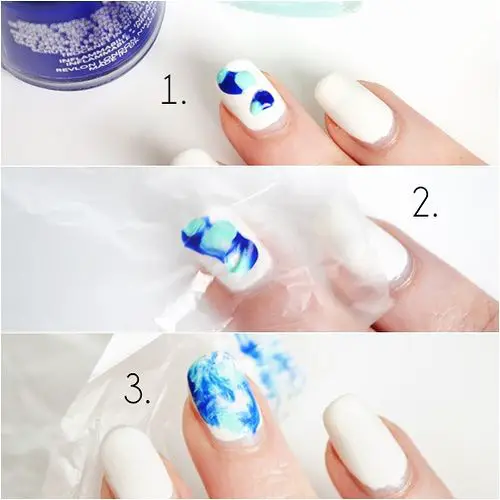
1. Marble Nail Design:
Things You Need:
- White nail polish
- Blue nail polish
- Light blue nail polish
- Plastic wrap
- Dotting tool
Procedure:
- Start by painting your nails white.
- With a dotting tool, pour some blue nail polish and light blue nail polish.
- Just disturb the poured nail polish lump by gently placing the plastic wrap over it.
- Let it dry and coat it with clear nail polish.
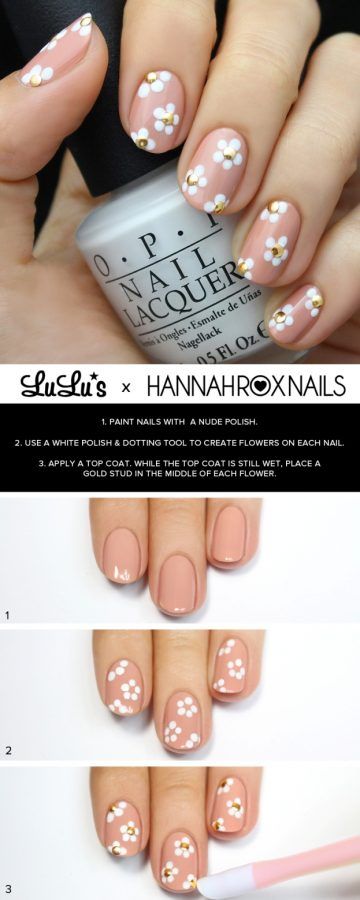
2. Flowers Design:
Things You Need:
- A white nail polish
- Matte pink nail polish
- Gold nail polish
- Dotting tool
Procedure:
- Start by painting your nails pink.
- Add white dots in a circle and a gold dot in the center with a dotting tool.
- Let it dry and coat it with clear nail polish
3. Color Splash Design:
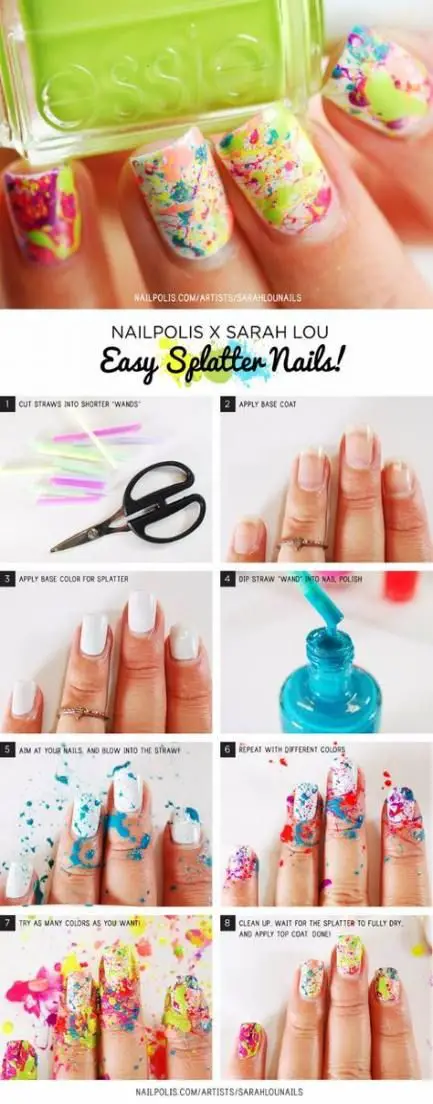
This is by far my favorite nail art design. You use your nails as a blank canvas and splash some colors around for that cool effect. Isn’t it just so artsy?
What You Will Need
- White nail polish
- An angled nail art brush
- Blue nail polish
- Yellow nail polish
- Pink nail polish
Note: You can use any colors of your choice for this look. It will still look just as cool.
Step By Step Tutorial
- Apply two coats of white nail polish for a good base.
- Once it dries, dip the brush in blue nail polish and using your thumb, splash the color over your nails.
- Follow this process for each color until you achieve the look you want.
- Apply a top coat to the set.
Your nails are your very own modern art masterpiece now!
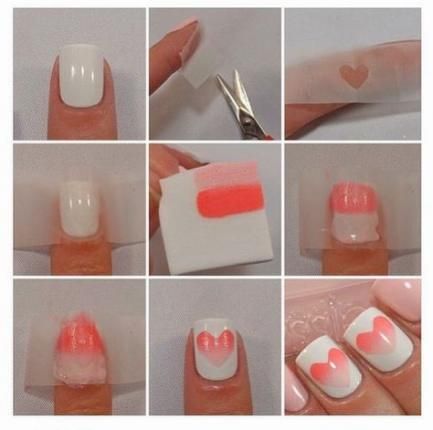
4. Subtle Heart Design:
Things You Need:
- A white nail polish
- Peach nail polish
- Light pink nail polish
- Sponge
Procedure:
- Apply a coat of white nail polish.
- Cut the nail art sheet in heart shape and stick it on the nail.
- Pour a little of both peach and light pink nail polish on a clean surface or a plastic sheet.
- Using a toothpick, slightly blend the colors.
- Dab the mixed colors using a sponge.
- Gently dab the sponge on the nail on the shape cut.
- Complete it with a clear nail polish coating.
5. Minion Nail Design:
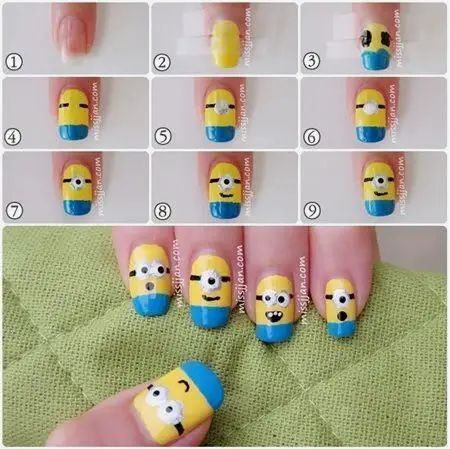
Things You Need:
- A white nail polish
- Yellow nail polish
- Blue nail polish
- Dotting tool
- Thin brush
Procedure:
- Apply a coat of yellow nail polish.
- Paint the tip with blue nail polish.
- Either with a thin brush, make a thin line beside white dots or do it as shown in the picture with strips.
- With a dotting tool, make white dots, the eyes with white nail polish
- With black nail polish, make a dot inside the white dot and a dot as a nose.
- You can see varying noses and mouths and make the art as you wish.
6. Diagon-Alley Pink And Gold Nail Design:
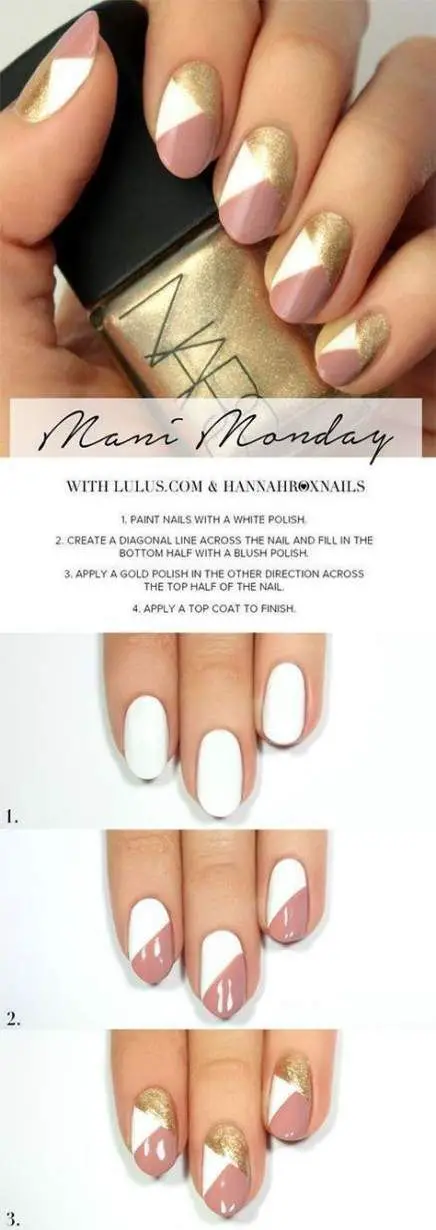
It’s trendy, vibrant, and young. You can pull it off casually, and it will brighten up your outfit and day!
What You Will Need
- Pale-pink nail polish
- Gold nail polish
- White nail polish
- Nail art stripes
Step By Step Tutorial
- Start by painting your nails white.
- Paint the lower half of the nail with a pale pink polish, going diagonally across the nail.
- Repeat the same with the gold nail polish, going diagonally across the other way.
- To finish, apply a top coat, and you’re good to go!
7. Canvass Shoe Nail Art:
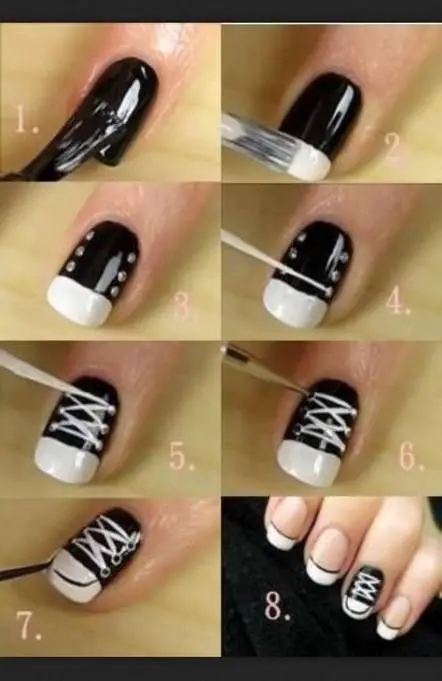
Things You Need:
- Black nail polish
- A white nail polish
- Dotting tool
- Thin brush
Procedure:
- Apply a coat of black nail polish.
- Paint the tip with white nail polish.
- Put dots as shown in the picture with white nail polish with a dotting tool.
- Take a thin brush and join the dots like a shoelace with white nail polish.
- Make a thin line at the tip with black nail polish for shoe detail, as in the picture.
8. Neon Colors Nail Design:
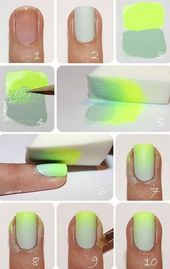
You can use the same techniques with whatever colors you choose. This is a simple technique and can be done in just a few steps.
Things You Need:
- A neon nail polish
- Grey shade nail polish
- Toothpicks
- Sponge
Procedure:
- Apply a coat of grey nail polish.
- Pour a little of the nail polish colors on a clean surface or a plastic sheet.
- Using a toothpick, slightly blend the colors.
- Dab the mixed colors using a sponge.
- Gently dab the sponge on the nail.
- Apply a coat of clear polish to finish the look.
9. Star Struck Nail Design:
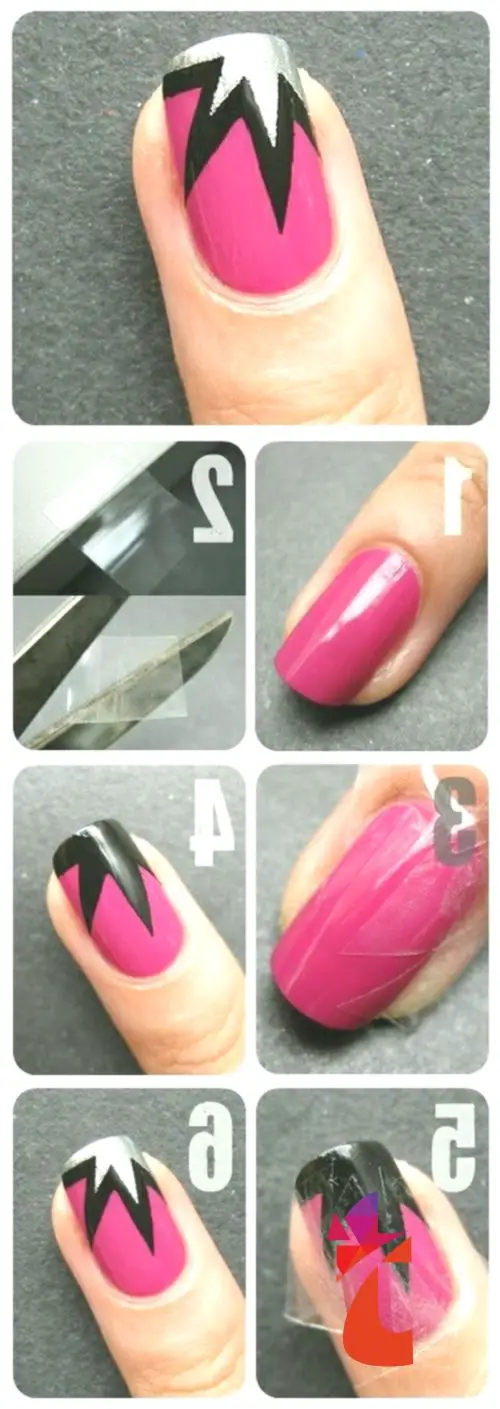
Things You Need:
- Black nail polish
- Pink nail polish
- Silver nail polish
- Plastic wrap
Procedure:
- Start by applying two coats of pink nail polish for your base.
- Cut plastic wrap in a star shape and place it near the tip.
- Paint with back nail polish at the tip in the cut star shape and let it dry.
- Adjust the plastic wrap into a smaller star and place it at the tip
- Paint the start with silver nail polish.
10. Purple-Pink Floral Nail Design:
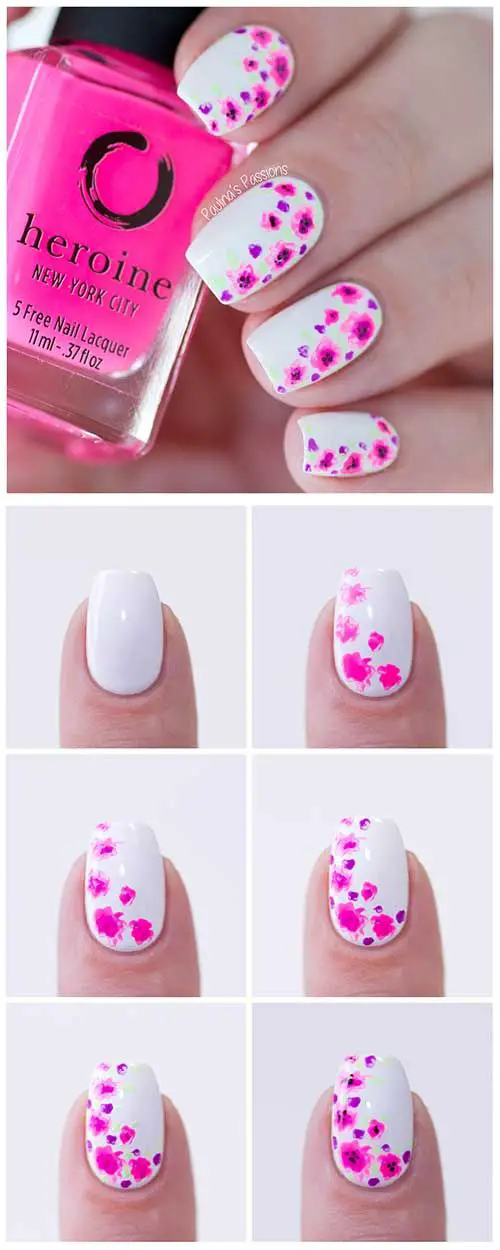
Don’t these nails look pretty as hell? The pink and white combination is delightful and is basically like you have spring on your fingernails. It’s a simple yet classy design and can be recreated in just a few steps. You can wear it to brighten those dull days or even on a sunny summer day.
Things You Need:
- A white nail polish
- Pink nail polish
- Purple nail polish
- A thin nail art brush or a nail art pen
Procedure:
- Start by applying two coats of white nail polish for your base.
- Using a thin brush, create the flowers with pink nail polish.
- Use the purple nail polish to add some oomph to the pink flowers.
- Finish with a topcoat.
You can choose to recreate this look differently by creating flowers on the whole nail instead of just one side. You can also use other bright colors over your white base.
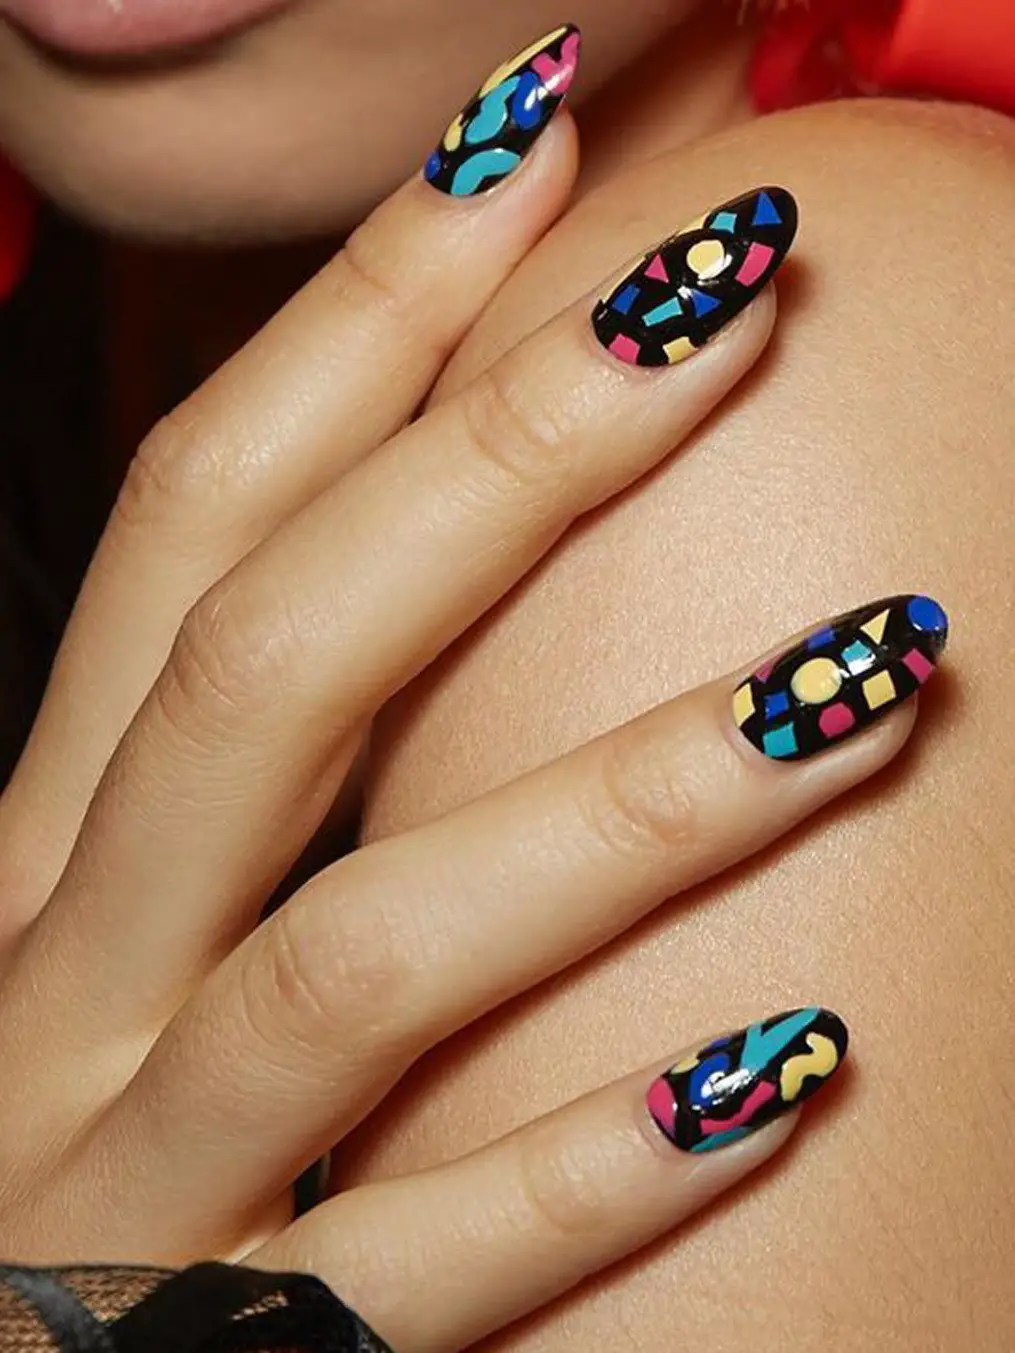
11. Leopard Nail Design:
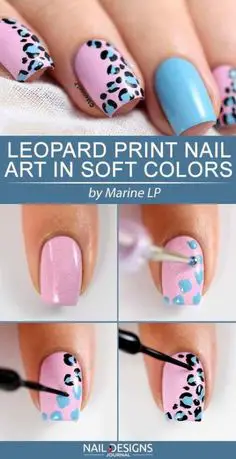
This design is fancy, and it can be worn on days you want to go a little extra! Also, super quick and easy!
Things You Need:
- Blue nail polish
- Pink nail polish
- Black nail polish
- A thin brush
- Dotting tool
Procedure:
- Paint your nails with two coats of pink nail polish.
- Create blue dots on the corners with the dotting tool.
- Outline the blue with black nail polish intermittently, as seen in the image.
- Apply a coat of clear nail polish.
12. Triple Cloud Nails:
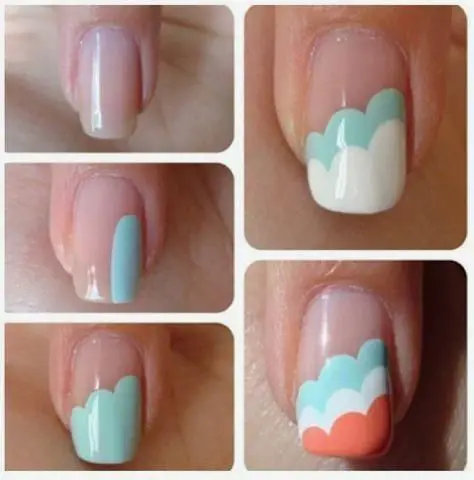
f you want to amp up your regular French manicure, this design is for you. It’s got a very minimal pale pink base and just a few pastel shades of nail polish to go with it.
Things You Need:
- Pale pink nail polish
- White nail polish
- Light blue nail polish
- Pastel orange nail polish
Procedure:
- Paint your nails using pale pink nail polish.
- To create the clouds, use a brush and start with the light blue polish by making vertical arcs, as seen in the picture.
- Repeat the process with the white and orange nail polish.
- Apply a coat of clear nail polish to the set.
13. Cute Kittie Nail Design:
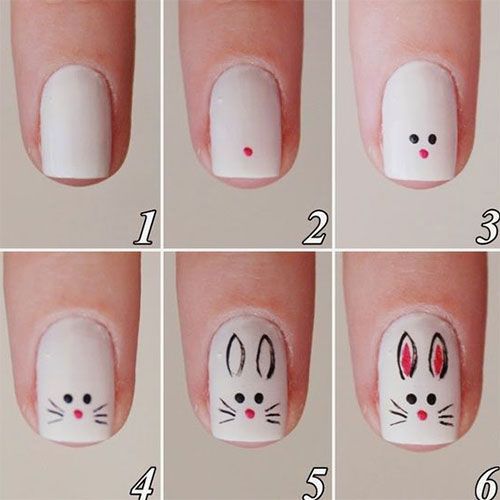
Things You Need:
- Black nail polish
- A white nail polish
- Red nail polish
- A thin brush
- Dotting tool
Procedure:
- Paint your nails using white nail polish.
- Add a nose and a small dot with red nail polish with the dotting tool.
- Then add eyes, two small dots with black nail polish.
- Take a thin brush, draw whiskers and ears as shown in the picture.
14. White Minimal Chevron Nail Design:
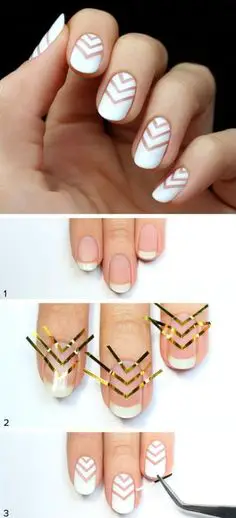
This minimal design is uber classy and straightforward to recreate. It’s all white, and anything all white automatically takes exclusive to another level. Don’t you agree?
What You Will Need
- White nail polish
- Thin nail strips
- Clear Polish
Step By Step Tutorial
- Start by placing the nail strips over your nail, creating three Vs.
- Apply the white nail polish to the tip of your nail.
- Use a thin brush to fill in the white between the Vs.
- Gently peel off the stickers while the polish is still wet.
- Apply a coat of clear nail polish to finish.
15. Snow Flake Nail Design:
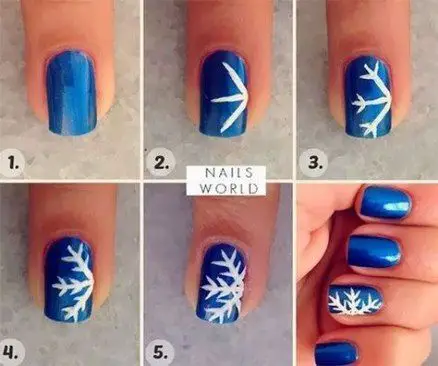
Things You Need:
- A white nail polish
- Blue nail polish
- Thin brush
Procedure:
- Paint your nails using blue nail polish.
- Let it dry.
- With the thin brush, start drawing snowflakes, as shown in the picture.
16. Striped Nail Design:

Things You Need:
- A white nail polish
- Red Nail Polish
- Nail art stripes
Procedure:
- Paint your nails using white nail polish.
- Paste strips as shown in the picture.
- Paint your nails nail.
- Remove the strips and let the nails dry.
17. Little Bow Nail Design:
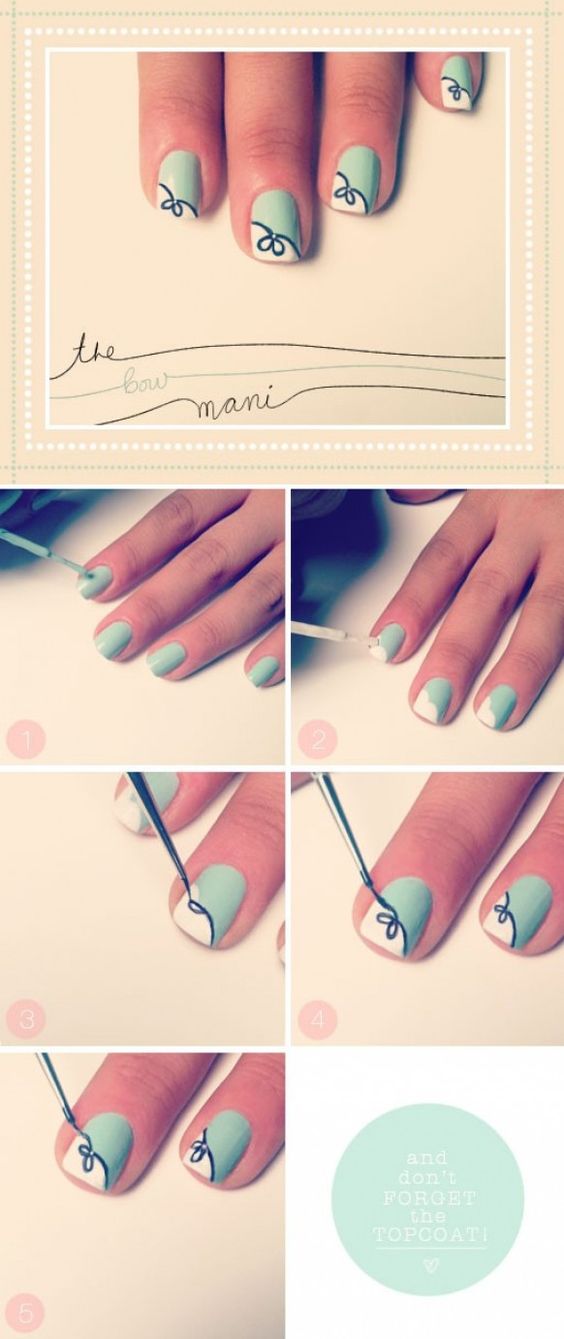
Things You need:
- Black nail polish
- A white nail polish
- Pale green nail polish
- Thin brush
Procedure:
- Paint your nails using pale green nail polish.
- Paint white nail polish across the tip as in the picture.
- With a thin brush, paint a bow with black nail polish.
- Finish it with clear nail polish.
18. Panda Nail Design:
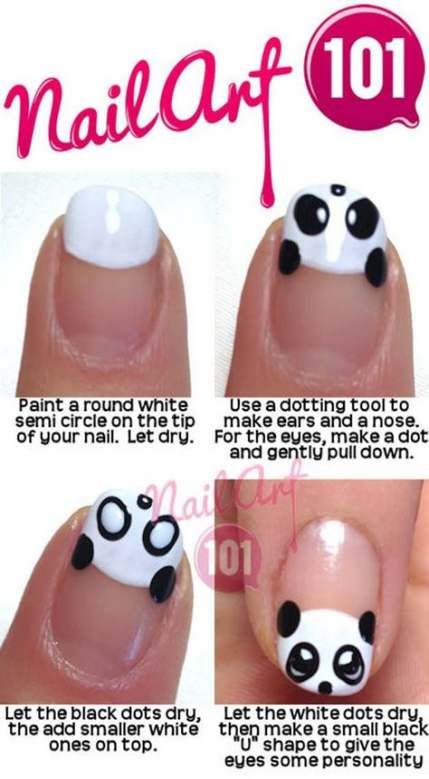
Things You Need:
- A white nail polish
- Black nail polish
- Dotting tool
Procedure:
- Paint a white semi-circle around the tip of the nail.
- With the help of a dotting tool, make eyes, ears, and nose as shown in the picture.
- Let the black dots dry, then add white ones on top.
- Let the white dots dry, then make a small back ‘u’ shape to give the eyes some personality.
- And a cute panda is ready on your nails.
