How To Do Eyebrow Threading At Home
Jump To:
During the lockdown, the womenfolk of our households have grown busier than ever, catering to all the family’s requirements. The women have to do everything from cooking in the morning to cleaning, washing, and all the other household chores. After all of this, they can’t get what they want, self-care time. Parlours and salons are closed due to the nationwide lockdown, so the essential skincare regimes of the women are gone, such as waxing, threading, and facial. Eyebrows are easily noticeable, and eyebrow threading becomes the primary concern. Let’s get into how to thread eyebrows and know is waxing good and how often can you get your eyebrows waxed?
What Is Eyebrow Threading?
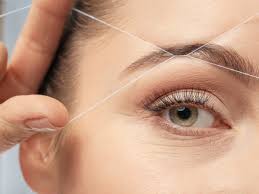
Threading is a hair removal method. It is popularly used to remove hair from areas such as the eyebrows, around the lips, cheeks, and chin. The technique incorporates using cotton threads that are twisted and used to pull the hair from the root, much like waxing and tweezing but with better and clean results.
How To Thread Eyebrows – A Step By Step Tutorial:
Here is the solution to the sad situation and ways to make the beautiful ladies out there feel the way they want- threading at home.
Eyebrow Threading Requirements:
- A sewing thread of cotton must be around 14 inches or 35 cm long. The thread is the foremost and advisable thing to use for threading. Try not to use a synthetic thread, as it cannot clasp the hair like a cotton thread can.
- An eyebrow scissors – The eyebrow scissors should be small in size. This is for trimming your eyebrows. It is to be done before threading. One can also use small hair shears.
- An eyebrow brush – You may use a fine-toothed hair comb if you don’t have an eyebrow brush. Use the brush to comb your eyebrow hair once, properly before you start eyebrow threading.
- Eyebrow Pencil – If you draw the eyebrow shape you want before threading, it can guide you as you thread your eyebrows. Choose a pencil shade similar to your brow-hair color or slightly darker than your brows. Use such a pencil that can later get cleansed off easily.
- Aloe Vera Gel / Ice Pack – The gel or ice, whatever the case may be that you are using, must alleviate your brows after completion of threading. It will also help reduce redness and irritation after eyebrow threading. You should wrap the gel or ice in a clean towel.
Eyebrow Threading Technique:
Prep your brows. In threading, a cotton or polyester thread should be used. It is doubled and twisted and then rolled over places with unwanted hair growth, and there you have a flawless eyebrow threading experience at home.
Step 1 – Find A Mirror
Stand in front of a clean mirror (free from all stains) in a well-lit room, where you can see your face correctly (one can also go about this step by fixing a small mirror in front).
Step 2 – Draw An Outline
Outline the shape you want, with a light hand on your brows, with the help of a well-sharpened brow pencil. Start drawing from the inside corners to stretching it outwards with a sweeping motion.
This step is vital, and you should not do not skip it, especially if you are doing it for the first time.
Make sure you don’t draw a shape that is very unlikely of the natural shape of your brows because, in this case, you don’t want to fill in the gaps; instead, outline your desired shape.
Step 3 – Prep Your Brows
The third step is essential, as this is the step where one preps the brows. Using the eyebrow brush, sweep the brow hairs in an upward direction. Here you want to make sure that you cover all the hair, especially if you have bushy brows.
When you are alright and see the stray strands exceeding the natural brow curve, repeat the process by dipping the wand/brush into the brow gel or the aloe Vera gel.
Step 4 – Prep Your Brows
Now, using the scissors, start cutting the strays. Repeat the process of combing the brows, but this time in the downward direction. Again trim the strays using the scissors.
Now take up the tweezers and start plucking the excess hair between the brows.
After this step, one is good to go, and 50% of the job is over. If someone is unsure of the threading part, one can end the process here, as, after this step, your brows should look slightly groomed and neat.
Step 5 – Prepare Your Thread
Make a loop by tying a knot and joining the two ends. Ensure that the knot is tightly secured not to become loose. Twist the thread and use it to remove the tiny strays as one does in a salon.
Step 6 – Twist Your Thread
The twist must always be in the opposite direction of hair growth. Be gentle while doing this, as it can be painful if the eyebrow threading is too harsh. Make sure that you stick to your outline for this step, as going overboard with it for the first time can be dangerous.
Step 7 – After Care
Once it is over and sound with the results, you might notice a bit of redness, and the skin around might be a bit sour than usual. This is normal, so don’t panic. Place some ice cubes or the aloe Vera gel and rub it gently to prevent further itching or rashes.
Voila! Your first-ever home eyebrow threading is a bang on.
Did you threading for the first time? If you’ve gone a little out of shape or pulled out one or two extra strands, don’t worry! Here are some home remedies for eyebrow and eyelash growth for fast recovery.
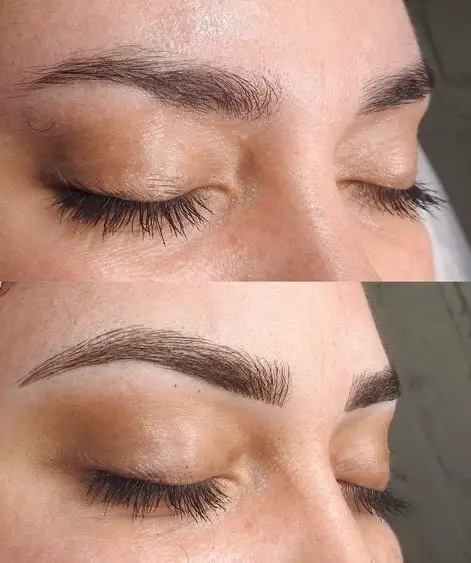
Eyebrow Threading Before And After:
Threading Advantages:
- It can last up to 4 to 6 weeks and make you feel confident and happy about how you want to look.
- Eyebrow threading requires a minimum time to invest when one gets the hang of it.
- It is mostly painless over experience and hassle-free.
- It gives a chance to light up your face with the minimum to feel better during these testing times.
- It is fast and precise, giving one a perfectly shaped symmetrical eyebrow.
Threading Disadvantages:
- It can be a bit risky if someone tries it for the first time at home.
- Eyebrow threading might not also be a very suitable option for those with sensitive skin or prone to acne or pimples.
- I would also not suggest it to someone who is not into eyebrow threading trying it forte the first time alone, as an initial idea of the threading process is essential.
- In the hands of a new threader, eyebrow threading can result in undesirable results if not careful.
Eyebrow Threading Shapes

For Oval Shaped Face:
You are lucky because most eyebrow shapes complement an oval face. Medium-thick eyebrows with a soft angle will be a great look to your face.
For Long Shaped Face
The goal for long faces is to minimize the length of the face. Flat eyebrows with a slight curve are the best way to achieve this. Because flatter brows help distract from the length of your face, perfectly complementing an oblong face.
For Round Shaped Face
A round face has soft features; balancing this out makes your eyebrows look sharp. Your eyebrows should be shaped with high and sharp arches. This will help cut the fullness of a round face and create the illusion of length.
Square Shaped Face
A square-shaped face has sharp features to balance the sharpness and add an illusion of length, shape your eyebrows high but with a soft curve.
For Heart Shaped Face
The heart-shaped face has a distracting pointy solid chin. To balance this out, keep the eyebrow curves soft. The arch should be kept low and full to add the appearance of length to your forehead.
For Diamond Shaped Face
A diamond-shaped face is most comprehensive at the temple region. To balance, you’ll need softness to counter the sharp feature. A full curve will reduce the appearance of width while softening your features.
Eyebrow Threading Vs. Waxing:
Here are some basic benefits of eyebrow threading over waxing.
- Skin typically doesn’t burn or get red.
- Threading can be focused on individual hair.
- Least noisy and has less time wasted than waxy.
- 100% natural, no chemical waxes, additives, or harmful procedures.
- Several people who break out from waxing manage not to break out from threading.
- The hair needs to grow over the skin to get threading.
- Hair gets thin and scattered over time.
- Threading pulls the most delicate hair from the skin surface.
- A good alternative for anyone using Retina and Accutane.
- 100% fit for extremely sensitive skin for waxing or laser hair removal.
- Hair does not grow back as quickly.
How often should someone do threading?
It mainly depends on the hair growth of the person.
What duration does it take to do threading?
It generally takes 5 to 10 minutes to do eyebrow threading. However, it much depends on a person’s expertise and the thickness of the brows.
Does threading hurt?
In most cases, it does not hurt, but if you are doing it for the first time, it might hurt.
What is the correct way of threading the upper part of the eyebrows?
Drag down your eyelid so that the skin under the eye is flat. The tweezers should be placed under the hair, and then the unwanted hair should be plucked out.
How much does it cost to thread your eyebrows?
Threading costs around the same as waxing and sugaring. The price will vary depending on where you live and the type of salon you go to but expect to pay $25 to $35.
Is it hard to learn how do you thread eyebrows?
It’s not without risks. “Doing brow threading at home, though, can be complicated, as you need both hands. So you cannot hold your skin tight, a key to threading,” explains Umbreen Sheikh, founder of Wink Brow Bar in New York City. At home, Sheikh says, “there is a possibility you can catch your skin in the thread.”
