How to Start a Crochet Chain
Jump To:
We may get carried away with all the stitches and combinations when learning how to crochet, but the truth is that it all starts with the most fundamental of stitches: the crochet chain and slip knot. The chain and the slip knot are the foundation of everything. You can’t even begin a crochet craft without them. The slip knot is the first thing you’ll need to learn. Here is the guide on how to start a crochet chain and how to make a slip knot.
What is a Slip Knot
A Slip Knot is a flexible loop that starts the crocheting process. It’s similar to the first step in a crochet project. These knots are used to get a crochet project started. It’s the first loop you’ll hook into with your crochet hook. If you’re following a crochet pattern, you’ll notice that a slip knot isn’t mentioned very often because you always start with one.
We see at least five different ways to tie a slip knot, some with the yarn wrapped around the index finger, some around the middle finger, and most of them perplexed me, so we will show you the most effortless approach that my mother taught me, which is incredibly simple and works perfectly.
A simple method for tying a slip knot
- To make the slip knot, start by pulling off a 6 to 8-inch strand of yarn.
- Place the tail of the yarn over the main yarn to make a loop.
- Next, flip this loop over the main working yarn such that it peeks underneath somewhere in the center.
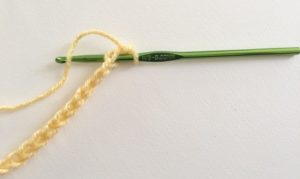
- Then, with the tips of your fingers, tug on that yarn until the knot tightens (as seen below with the crochet hook).
- To make it easier, hold the yarn ends with the other hand.
- On one end, you’ll have a loop, and on the other, you’ll have strands of yarn.
- Make the slip knot a couple more times until you feel comfortable with it.
- If you’re having trouble gripping and pulling the yarn with your fingertips, use a hook instead.
Now that you’ve mastered the slip knot, let’s learn how to crochet chain stitch for beginners.
What is a crochet chain
Before you start, keep in mind that one can refer a chain in various ways, including chain, crochet chain, chainlink, foundation chain, and beginning chain. Let’s call it a crochet chain for the sake of simplicity.
- To make a crochet chain, begin with a slip knot, and an introductory stitch called a chain, just a yarn loop.
It’ll be referred to as CH in the patterns. - CH stands for chain stitch, which you use to make the first crochet chain and individual chains used in patterns.
- The number of chains required to begin the project is usually specified in patterns.
- We’ll conceive of CH as a crochet chain stitch for the time being.
How to make a crochet chain
You use a slip knot to begin a crochet chain (see above).
- To begin, we’ll grasp the slip knot in our left hand between our thumb and pointer.
- On the left hand, the long end of the yarn is wrapped around our middle, ring, or pinkie.
- With our right hand, we’ll grasp the hook.
- Hook through the loop made by the slip knot.
- Wrap the yarn around the hook’s tip once (also known as Yarn Over or YO) and draw the hook out of the slip knot, making sure the yarn is pulled through as well.
- Voila! Here is the new loop!
This is your first stitch, and it’s called a chain (CH or 1 CH). The procedure for creating the following chain is slightly different.
- Wrap the yarn around the tip of the hook and pull the yarn out and through the loop of the chain, using your left hand to hold the chain and yarn and your right hand to hold the hook.
- This is how you make all of the following chains: Wrap the yarn around the hook (YO) and draw the loop through to produce an additional chain.
- Repeat this process until you have as many chain loops as you require (or the pattern requires).
While building the chain, keep the loops at around the same size and don’t make it too loose or too tight.
As you learn to grasp the hook while wrestling the yarn into position while not letting the yarn fall off the end of the hook as you draw through as a novice, your initial chains may come out incredibly tight. This may frustrate you easily, but don’t give in to it. Please continue to practice until it is second nature to you.
All of the first stages are difficult, but the great part is that you can learn everything in crochet one step because you work with one loop at a time.
How do you start a crochet chain step by step?
How do you start a slip knot for a crochet chain?
Do you crochet into the slip knot?
The instructions will always state how many chains to skip before starting the first stitch. Excluding the first stitch, you will work into every stitch in the chain unless the crochet pattern states differently, but not into the starting slip knot.
