Different Types Of Satin Stitches – Types Of Satin Stitches
Jump To:
Satin stitch has a straightforward process. But the tricky thing to maintain in the types of stitches is the neatness, especially on the edges of the pattern that is being filled. So, it is widespread that a satin stitch is outlined by using one of the straight stitches like the Outline Stitch or Chain Stitch, etc. This helps in comprising the types of satin stitches within the parameters of the pattern quickly. We will discuss more the types of embroidery satin stitches throughout this article which gives you an idea of how to embroider. Just like these satin stitches, there are feather stitches. Check out feather stitches and variations.
Also, while doing a satin stitch, we have to ensure the stitches are not pulled too tightly as it will distort the fabric whereas, keeping it to lose will sag the stitch. To remove these two problems, it will be advisable to use an embroidery hoop to hold the fabric properly. If the material is taut, the satin stitch will be simpler to do.
1. Petal Satin Stitch
It is one of the primary and most used stitches in satin embroidery, and it is pretty easy to obtain.
Steps to create petal satin stitch:
- First, draw a flower or petal for easier stitching.
- Divide the petal in half and come up through the top of the petal and then come back down in the middle at the edge of the flower circle.
- Then come up from one of the halves of the center of the petal and come back down at the middle of the flower circle, then do the same thing by coming up from the edge of the petal and going back down at the edge of the flower circle. Complete the first half before moving on to do the other half and do the same.
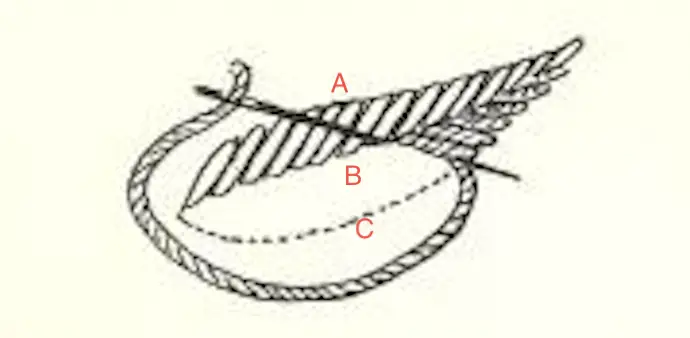
2. Two-Tone Satin
This satin stitch is a classic take on the embroidered leaf, which is done with a fishbone stitch.
Steps to create Two-tone Satin stitch:
- Draw a leaf pattern on the fabric and divide it with a centerline. You should have three lines for making the steps easier; name them A, B, and C.
- First, bring the needle out from the top tip of line B and put it in through line B again but keep a small distance from the first point.
- Now bring the needle out from the point close to the tip of line A. put it in through a point in line B relative to the 2nd point. Again pull the needle out through a point very close to the tip of line C.
- This process of putting in the needle through A and C will follow and connect lines A-B and B-C. and avoid any space between the stitches.
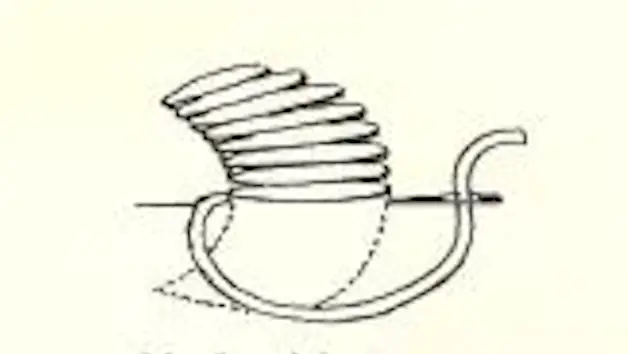
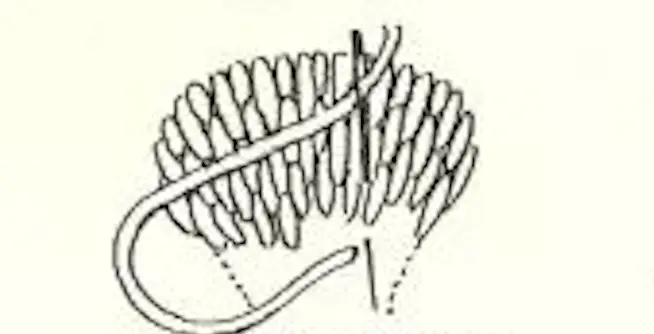
3. Scroll Satin Stitch
This stitch reminds me more of a ‘wave’. Indeed, it is a gorgeous stitch to fill in patterns. It can also make excellent-looking borders or can be utilized as a decorative stitch in different embroideries. Scroll stitch is usually worked from left to right.
Steps to create Scroll Satin stitch:
- Bring out the needle from the left edge of the stitch line. From a short distance towards the right, take the needle in and out of the fabric from either side of the stitch line. Keep the thread beneath the needle while you do this. Do not pull out the needle completely.
- Next, revolve the thread around from under the needle again such that it forms a circle, then pull the needle out completely to get a stitch.
- Continue this given pattern of action of making circles around the needle as you progress towards the right.
4. Bud Satin Stitch
This type of stitching is similar to petal satin stitching, and it is pretty easy to do it.
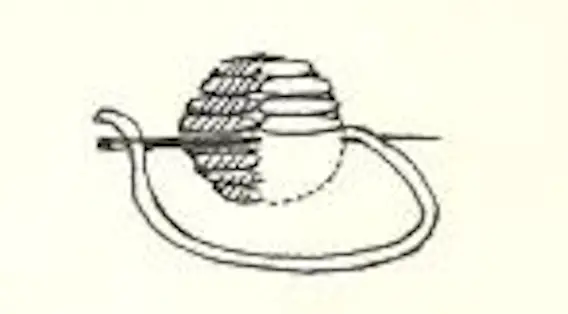
Steps to create Bud satin stitch:
- Draw a small circle-shaped bud with a centerline for your guidance.
- The centerline does the same as the petal-satin stitch for both the half without having any space between the stitches.
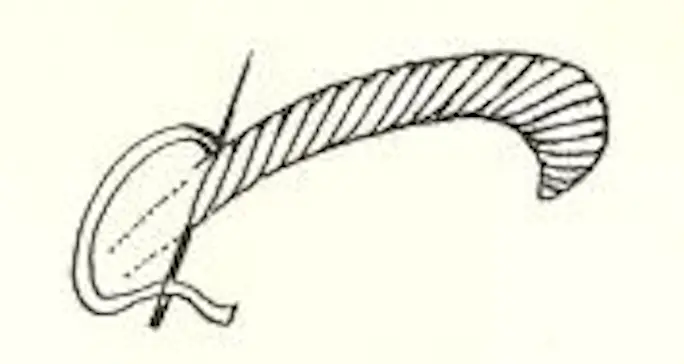
5. Pointed- Leaf
Most satin stitches don’t have a pointed end, but this pointed-leaf satin stitch is for having that perfect pointed-end leaf stitch that everyone wants.
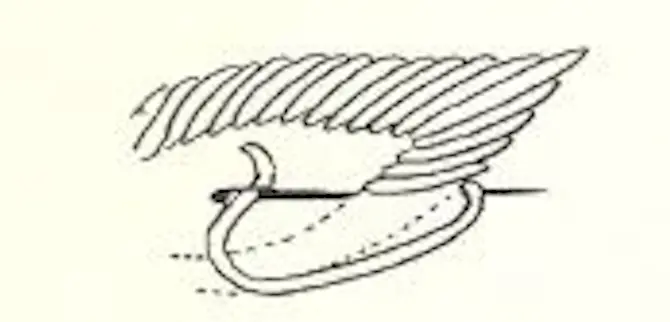
Steps to create pointed leaf stitch:
- For your reference, draw a figure of what you want.
- Begin from the base of the leaf and put the needle through the top of the leaf. Follow the same direction until you reach the top edge of the leaf, then come back down in a similar way without keeping any space between the stitches.
6. Oval Satin Stitch
This classic satin stitch can be stitched in various directions. Based on the size of the oval you want, you can either do vertical or horizontal stitches.
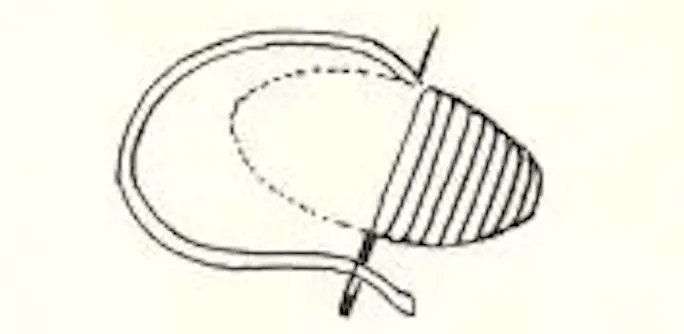
Steps to create Oval-Satin stitch:
- Draw an oval shape for your assistance.
- Take the needle down straight across from where you brought the needle up on the opposite side of the oval you are filling.
- Bring the needle up on the shape where you started near where the needle came up on the previous stitch.
- Continue this process till the oval shape is filled, and you will get your desired stitch.
7. Needle Painting
There is no shock that the needle painting is called that. It is a painting with your hand sewing needle and embroidery thread, embroidering realistic-looking designs with tiny and straight stitches, which almost look like paint strokes.
Steps to create Needle Painting stitch:
- The individual portion of the design is outlined with a split stitch, and then the inside is filled by the long and short stitches, enclosing the outline.
- While doing the needle painting, put the fabric with the design on into your frame or hoop, making sure it is taut.
- You will require to take many embroidery needles.
- Thread your needle with a single strand of embroidery thread.
- Do this for all the needles.
8. Slanted- Flat
This stitch is very similar to the fishbone stitch. The difference is that this stitch can not give sharp ends, and therefore is not appropriate for leaves with sharp and tapering ends.
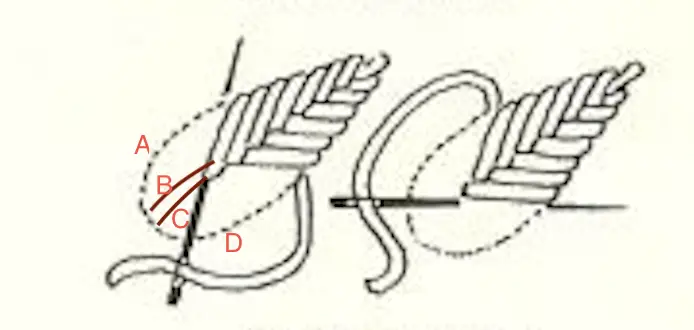
Steps to create Slanted-flat stitch:
- First, draw four curved lines for your help and name them A, B, C, and D, keeping a minimal distance between each of them.
- Bring the needle out from line A, then put it in through line C. Please give it a slight slant.
- Bring the needle out from line D and put it through inline B. again, bring out the needle through line A and continue the same process. Keep in mind to keep the stitches close to each other.
- The only way for a neat pattern is to keep the points on A and D parallel with each other. Similarly, keep the points on B and C parallel to each other.
- Remember to keep the needle a bit slanted to have the stitch that you want.
We hope that you have understood the types of embroidery satin stitches and how to do it through this article. You should keep in mind that practice makes a man perfect, so keep stitching and you will see better results in front of your eyes.
How do you make a satin stitch?
What do you use satin stitches for?
Why is it called satin stitch?
The term satin stitch derives its name from its similarity to the shiny appearance of satin cloth, especially when a floss silk or a mercerised cotton thread is used for the embroidery. … The stitches may be worked in any direction and they may vary in size, for example, when filling in a leaf shape.
What is satin stitch in knitting?
Satin stitch is a row of stitches in embroidery or sewing that are all sewn up, close together to cover a whole section in thread. With the neat, tight stitches lying flat together it gives a smooth satin-like effect. … All the different coloured threads create a fantastic effect on a plain grey fabric.
Why is satin stitch so hard?
Satin Stitch Tip #2: The Fabric Makes a Difference Fabrics with spaces between the warp and weft threads make it more difficult to achieve a smooth, straight edge with satin stitch.
How do you start and finish a satin stitch?
How many threads do you need for a satin stitch?
HOW MANY STRANDS OF FLOSS SHOULD I USE FOR MAKING THE SATIN STITCH? The lesser strands you use, the smoother finish you will get with the design. I prefer using 2 strands of floss for making the satin stitch. At times, I use just one if the design calls for a smoother finish or 3 strands as per necessity.
How many threads do you use for satin stitch?
For starters I like to use 2 strands of floss as much as possible. Of course in some of my patterns it may call for 1 thread or 3 threads at times, but my preference is to use 2. I find that this is the easiest way to work to achieve a neat finish, less tangles and generally a better stitching experience.
What is the difference between satin and fill stitch?
Satin stitches are essentially columns of stitches used for making letters, borders, and areas of a design that need columns of stitches. … The Fill Stitch is used for filling in larger areas of the design. Fill stitches can also be used for lettering and large column areas when it is too large to use a satin stitch.
How do you do a satin stitch on a sewing machine?
What is double satin stitch?
The double satin stitch technique used is known as do-rukha and ensures exact duplication of the image on the reverse. … The embroidery was done with silk thread using satin stitch in bright colours especially if the theme was folk art, on hand spun fabric like mulmul.
What is the Lazy Daisy stitch?
Lazy Daisy stitch is nothing more than a simple loop arranged in groups to create flowers, combined in a line to make Chain Stitch, or worked individually to create leaves. There are also a number of variations for taking this simple stitch to the next level. Let’s start this lesson by making a simple flower.
